After performing the steps outlined in this article, a Schedule menu will appear in the DeliverPoint Online console, and the following reports can be run as Scheduled Reports (as of version 4.3.0.0). [Note: Beginning with version 4.4.0.0, the Schedule menu will appear by default in both the DeliverPoint site extension (the icon in the upper right), and also in the DeliverPoint console, but the list of reports will be greyed out until the Scheduled Reports feature has been configured.]
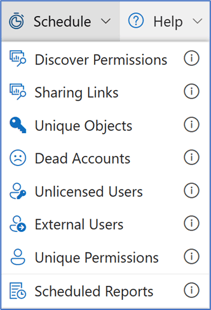
After scheduling a report to be run, you can click on Scheduled Reports to check the status of your report, and when it's ready to view, you can click the Open icon to open the report within the DeliverPoint UI (new in version 4.4.0.0 - previously, there was a link to the completed report as an Excel file).
NOTE: As of December 2024, a new Azure deployment wizard is available to configure the DeliverPoint Scheduled Reports feature. This method does involve some Azure costs for your organization, but the setup is far easier than the steps listed below, which may also have associated costs. Please see this article for instructions.
NOTE: The installation and configuration steps below should be performed by someone familiar with the steps described. In your organization, this may be an IT administrator who has experience with Microsoft Azure/Entra. If you do not have access to the Azure resources described below, please see this article instead.
Components and description
The DeliverPoint (DP) SPFx (SharePoint Framework) Scheduled Reports feature requires 5 components:
- DP SPFx client-side application version 4.3.0.0 or higher, deployed within SharePoint (SP) Online. Provides a centralized interface for all DP features including reports, permissions management, license configuration, and scheduled report generation and storage. This is the standard sppkg file that you already have deployed if you are currently using DeliverPoint.
- Http-based RESTful Web Application deployed to Azure Web App service. Handles requests from DP SPFx and manages the DP database.
- SQL DP database: An Azure SQL database to store some sensitive configuration data (e.g. registered Azure Application details) and information about scheduled reports (jobs).
- DP Job Processor: A Windows Console application that will be run via an Azure Web App WebJob. Connects to SharePoint Online via CSOM to enumerate SP-related entries (Sites, Webs, Lists, Items, Users, Groups, Permissions, Roles), connects to Entra ID to enumerate AD Users, Groups, and Group Members, and executes scheduled jobs (reports) and stores them in a SharePoint Library.
- Registered Azure Application. Required for the Job Processor to have access to SharePoint and Entra ID.
Deployment example on Azure Services
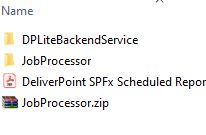
- Required files (you can download the current version of these setup files here):
- REST service package for Azure Web App deployment (DPLiteBackendService folder)
- Job processor standalone application package (JobProcessor folder) to execute as Azure Web App WebJob
- Necessary Azure Services. The pricing plan for the necessary services can be chosen according to your current needs.
- Azure Web App service running on Windows and using ASP.NET 4.8 runtime.
- Azure SQL Server database.
Deployment steps
1. Create an Azure SQL Database Server, which is required in order to create the necessary Azure SQL database.

The specified server name will later be used in the database connection string. DeliverPoint will use SQL authentication for connecting to this database, so the selected authentication method must support SQL authentication. For simplicity, we will use the specified admin login and password later in the connection string, but generally, it will be possible to create and use a non-admin account for connecting to the database.
2. Enable public network access and access from Azure Services for this SQL server. Open the Networking page for the SQL server and change the settings as shown below. If no Virtual network or Firewall rule is added (as is shown below), then the SQL server (and databases in it) can be accessed only from Azure Services.

3. Create an Azure SQL database inside the server created in Step 1. The name specified for the created database will later be used in the connection string for connecting to the database.

4. Copy the connection string to the newly created database for use in upcoming steps. Go to the Connection Strings page for the newly created Azure SQL database, and copy the connection string intended to be used for SQL authentication. For {database_name}, specify your created database name, and for {your_password}, provide the password that you specified for the SQL admin account in Step 1.

5. Create an Azure Web App service for hosting the DeliverPoint REST service and for running the JobProcessor application. The specified Name will be the beginning of the domain name that will be used in the DP REST service URL. For this example, the domain name is DPTestWebApp.azurewebsites.net
Select ASP.NET 4.8 for the Runtime stack. Select an appropriate Pricing plan, determined by your organization. Note that the "Always On" option mentioned in the next step is not available in the "Free" pricing plan.

Click Review + create (it's not necessary to configure the other pages). Then Create if everything looks correct. The web app will go through a deployment phase. After seeing "Your deployment is complete", click Go to resource.
6. Enable the Always On option for the Web App created in the previous step. Navigate to the Configuration page for the Web App and turn on the option highlighted below under the General Settings tab. Enabling the Always On option is necessary to allow the JobProcessor to be running regardless of whether or not the Web App is idle.

7. Get the information (URL, Username, Password) necessary to upload the DP REST service files via FTP. Navigate to the Deployment Center page for the created Web App, switch to the FTPS credentials tab, and copy (to Notepad or similar) from that page the values highlighted below (FTPS endpoint, FTPS Username, and Password). The copied values will be used to connect to the Web App file system via secure FTP.

8. Modify the connection string in the DP REST service Web.config file before uploading the service files to the Web App file system. Open the Web.config file (in the DPLiteBackendService folder) and replace the connection string in it with the connection string copied in Step 4.

9. Connect to the created Web App's file system using an FTP client and upload all files from the DPLiteBackendService folder to the wwwroot folder of the Web App. First, connect to the Web App file system, specifying the FTPS Endpoint URL, Username, and Password copied in Step 7.

After successfully connecting, any existing files in the Web App wwwroot folder must be deleted. Before the initial upload, that will be one file, but for future DP service updates, all old version files must be deleted before uploading new ones.

After emptying the wwwroot folder, upload all files from the DPLiteBackendService folder to the wwwroot folder of the Web App.


10. Modify the connection string in the JobProcessor.exe.config file before creating the JobProcessor WebJob. Open the JobProcessor.exe.config file in the JobProcessor folder and replace the connection string in it with the connection string copied in Step 4.

11. Create a certificate for the Azure application by running the following PowerShell command from within the JobProcessor folder:
.\Create-SelfSignedCertificate.ps1 -CommonName "NAME" -StartDate START_DATE -EndDate END_DATE
The PowerShell script Create-SelfSignedCertificate.ps1 is in the JobProcessor folder. NAME is the desired name of your certificate. START_DATE is the beginning validity date of the created certificate (such as today). END_DATE is the validity ending date of the created certificate. (Note that you will need to perform this step again when the certificate expires, so consider that when choosing an End Date.) Both dates must be specified in the format YYYY-MM-DD. During the execution of this command you will be prompted to provide a password that will protect the created certificate. Both the certificate name and the provided password will be used later for DP SPFx configuration. After running this command, two files with the specified certificate name will be created in the JobProcessor folder: NAME.pfx and NAME.cer
12. Copy the two certificate files created in Step 11 to the wwwroot folder of the Web App service using the FTP client in the same way as you copied the DPLiteBackendService files to the wwwroot folder in Step 9.
13. After making the changes to files in the JobProcessor folder as described in Steps 10 and 11, create a zip file of the entire JobProcessor folder.
14. Create a WebJob inside the Web App created in Step 5. Navigate to the WebJobs page of the Web App, and click +Add to create a new WebJob with the desired name (e.g. JobProcessor). In the File Upload field, browse for the zip file created in the previous step.

After the JobProcessor WebJob has been created, it can be controlled from this same page. For example, it is possible to run the job (if it's stopped), stop running the job, view logs (output of console window), or delete the job. Deletion of the job might be useful in cases when it's necessary to update the JobProcessor application. In that case, it will be easier to remove the current WebJob and create a new one.

15. Configure an Azure Application for SharePoint/AD access.
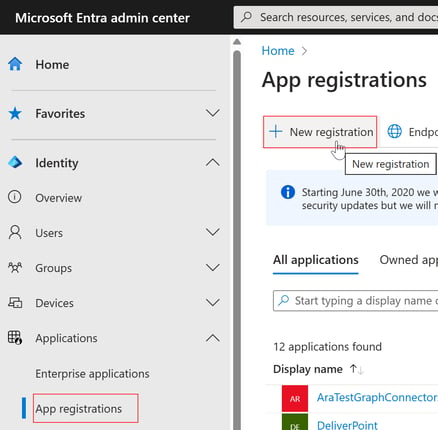
a. Create a new Azure Application from Entra > App registrations > New registration
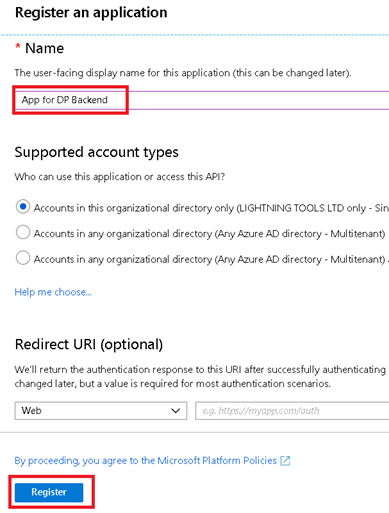
b. Give it any name and press Register.
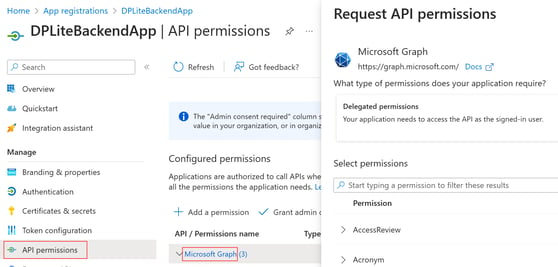
c. Go to API permissions, and click the Microsoft Graph link to open the permissions page required for the application.
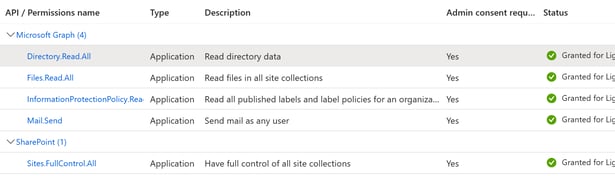
d. Select the required Application permissions: Directory.Read.All, Files.Read.All, InformationProtectionPolicy.Read.All, and Mail.Send (new in version 4.4.0.0 to allow notification that the report has completed).
e. Also add the SharePoint > Sites.FullControl.All Application permission. This is required to be able to use the SharePoint CSOM/REST API.
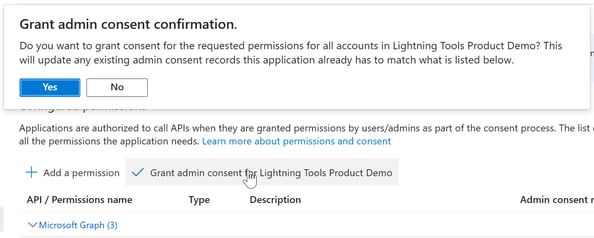
f. Grant admin consent for the selected permissions.
g. Go to the Certificates & secrets page for the created Azure Application. Go to the Certificates tab, and click Upload Certificate to upload the certificate (.cer file) created in Step 11. You can specify any description for the uploaded file.
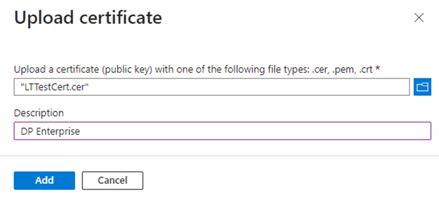
Click Add to upload the selected certificate.

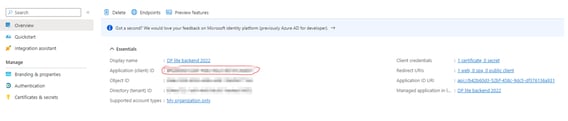
h. Get the Application (client) ID key from the Overview page; this will be used for the DP SPFx configuration.
i. (Optional - if you wish to be able to use DeliverPoint to assign sensitivity labels to files) Connect the created application to an Azure subscription. Using DeliverPoint to assign sensitivity labels to files requires calling a metered Graph API request (the cost as of June 2025 is $0.00185 per request). You must run the following Azure CLI command:
az resource create --resource-group RES_GROUP --name RES_NAME --resource-type Microsoft.GraphServices/accounts --properties "{""appId"": ""APP_ID""}" --location Global --subscription SUB_ID
RES_GROUP is the name of the Azure resource group of the target subscription, in which the necessary resource (Microsoft.GraphServices/accounts) will be created. RES_NAME is the name of the created resource. APP_ID is the id of the application (client ID) taken from the previous point. SUB_ID is the id of the target Azure subscription. Before running the above command, it will be necessary to log in to the appropriate tenant (with a user account that has permissions to create resources in the target subscription) using the command az login
16. Configure DeliverPoint SPFx
a. Specify the DeliverPoint REST service URL for the current tenant. This activates the DP Enterprise features, i.e. the modified configuration pane and the Schedule button. This can be done via the following SharePoint Online Management Shell command:
Set-SPOStorageEntity -Site APPCATALOGURL -Key _lt_deliverPointServiceUrl -Value SERVICEURL -Comments DPServiceUrl -Description DPServiceUrl
Where APPCATALOGURL is the URL of your tenant's app catalog site collection, and SERVICEURL is the URL of the DP REST service ending with /api/
The domain part of the service URL was created in Step 5 above. For our example, the full service URL is https://DPTestWebApp.azurewebsites.net/api/ NOTE: be sure to include the / at the end of the URL.
b. Configure the service via the DP SPFx configuration pane. After following the above steps, you will see that if you edit a DeliverPoint web part (that is, add a DeliverPoint web part to a SharePoint page, and click the icon in the upper left to edit the web part properties), there is now a configuration panel as shown below (license information will now be on Page 2 of the panel). The following information must be provided (once for the entire tenant):
Active Directory Domain Name: The name of the domain used by the current tenant
Azure Application ID: ID of the Azure application used by the service to retrieve necessary information from Entra ID
Azure Application Certificate: The name of the certificate .pfx file created in Step 11
Certificate Password: The password specified when creating the Certificate
SharePoint Administration site URL: URL of the SP administration site for the current tenant (this is the same -admin URL one would use for the SPO Management Shell, e.g. https://contoso-admin.sharepoint.com)
Operator Accounts: List of accounts, for which the generated scheduled reports will not be security trimmed. For all other users, the generated scheduled reports will be security trimmed based on the report initiator's permissions.
Logging Level: Select the minimum level of logged events to be stored. Possible values are Error, Warning, Information, or Diagnostic. For example, if the user chooses Warning, then only Error and Warning level events will be logged.
Log Retention Period (Days): Specify how many days logs will be stored in the database. After the specified period, log entries will be automatically removed. If no retention is specified, then logs will not be removed automatically.
Example:

The Certificate Password field must be filled in only when specifying the Certificate initially, or when updating the Azure Application Certificate configuration data. In other cases, this field will display as blank, as DP SPFx is not getting it from the server.
DeliverPoint should now be ready to run Scheduled Reports!
Published Dec 22, 2023
Updated April 17, 2024 (v 4.4.0.0 updates)